Turbine Blade Inspection
Turbine blades used in aircraft engines and power generation systems are designed with internal air cooling channels which allow the blades to operate under extremely high temperatures. Thickness variation at the cooling channels which is caused by bad machining repair or surface wear during operation can affect the blade temperature which would impact its overall strength. Therefore, to ensure structural integrity of the turbine blades, it is important to control the material thickness at the channels position.
WALL THICKNESS MEASUREMENT
Nondestructive ultrasonic testing is commonly used to evaluate the blade wall thickness at the channels positions. To achieve this task we typically use thickness measurements instruments with contact ultrasonic probes. This manual thickness measurement approach can be both time consuming and subject to human error.
For proper wall thickness measurement of multiple turbine blades, an automated scanning system is desirable. In this case, local or total immersion of the blade is necessary to measure the thickness without contact. The automated immersion system will allow us to precisely control and adjust the angle of the ultrasonic beam. With such automated system, wall thickness measurements of the blades can be done at specific locations (point by point), or by performing C-Scan thickness mapping of the blade surface.
TecView multi-point wall thickness measurements
IMMERSION SCANNER
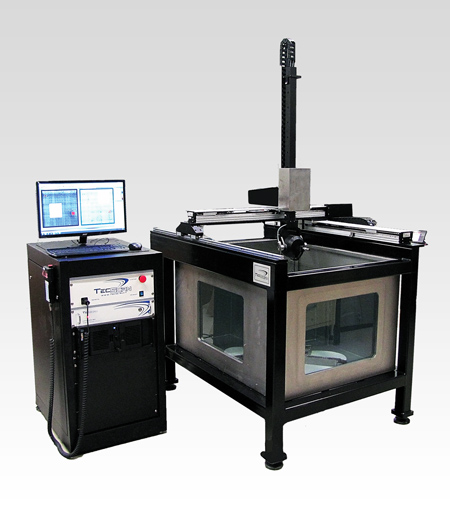
TecScan’s ultrasonic immersion scanner is used to measure wall thickness of turbine blades. The scanner is fully automated and piloted by TecView™ for data acquisition and analysis. The immersion scanner is also equipped with an automated probe manipulator. Depending on the orientation of the turbine blade in the immersion tank, the manipulator head can be used a swivel-gimbal or gimbal-gimbal.
Immersion Ultrasonic Testing Scanner
POINT-BY-POINT CONTROL
For point-by-point thickness control, the specific discrete wall thickness measurements points of the blade are recorded in a proper sequence. This can easily be achieved using the Point-by-point scan type of the TecView™ software. In this case, the operator manually programs the location of each measurement point with the optimal probe orientation on a reference blade. Multiple blades of the same model can then be automatically controlled and the data for thickness/location is saved along with the serial number of the blade.
Thickness is measured at different positions on the blades by setting up gates on the front and backwall echoes
C-SCAN THICKNESS MAPPING
Wall thickness measurement of turbine blades can also be achieved from C-Scan thickness mapping. Using contour or surface following scans in TecView, full thickness mapping can be performed on large areas of the blades. The advantage of this approach is to eliminate uncertainties related to the blade’s channels positions as well as to detect any structural imperfections, including cracks and inclusions.
In TecView, the surface of the turbine blade can be constructed by extruding the contour from at a proper section of the blade, as illustrated below. With properly defined blade contour, an ultrasonic C-Scan could be performed with stable water path and probe orientation along the blade length.
Construction of the blade contour using ultrasounds in TecView
C-Scan results of turbine blade using TecView
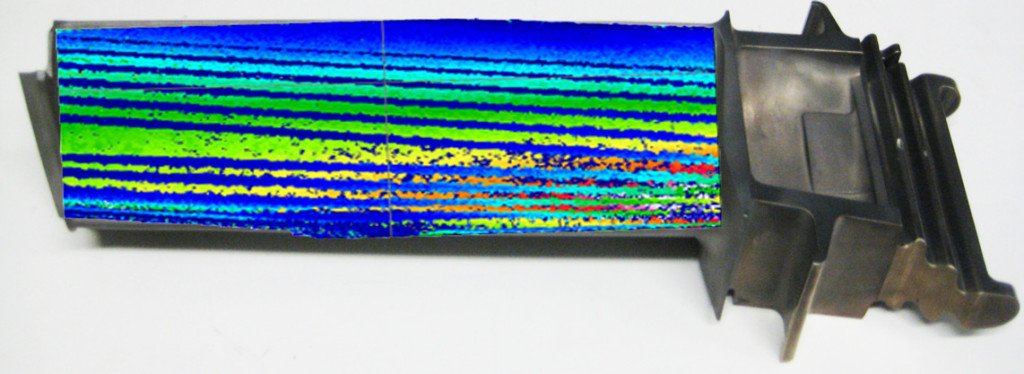
The above C-Scan results clearly show all the cooling channels as well as their depth relative to the full thickness. The dark blue lines running from left to right of the C-Scan represent the holes in the blade. Variations in depth of the holes and of the full thickness can also be observed by color variations in the thickness mapping. Such a representation allows measuring the thickness at any point of the C-Scan.
Superposition of the C-Scan image and a picture of the blade showing the approximate coverage of the C-Scan thickness mapping
Alternatively, turbine blades that present a more complex surface curvature can be inspected using the CAD import option of the TecView™ 3D software. In this case, the CAD model of the blade replaces the extruded contour and provides the orientation of the surface that is necessary to define the probe displacements and orientation.


