TecView™ TOFD
TecView™ TOFD is a true Windows® based software designed for Time-Of-Flight Diffraction inspections, from data acquisition to data analysis. Combining the best of Windows® operating system and graphical user interface, its intuitive and user-friendly interface features are specifically developed for the inspection of welds in plates and cylindrical structures.
Precise sizing and defect characteristics can be recorded in a complete inspection report using the software’s reporting utility
Advanced data acquisition & analysis software !
Versatile tool designed for Time-Of-Flight Diffraction inspections of welds.
TecView™ TOFD software
This software package includes optimization tools for the inspection setup, Data acquisition and Management, as well as Analysis and Interpretation modules, this time-of-flight-diffraction software assists with the task of performing TOFD inspections from start to finish.
INSPECTION SETUP
The INSPECTION SETUP module aids the user to determine all relevant scanning parameters from a modeling of the wave propagation within the inspected structure. Once in the ACQUISITION module, Ultrasonic and scanner parameters can be set and gates can be defined to synchronize and record the region of interest within the digitized A-Scans. Once the scan begins, the A-Scan and B-scan or D-Scan are displayed in real time.
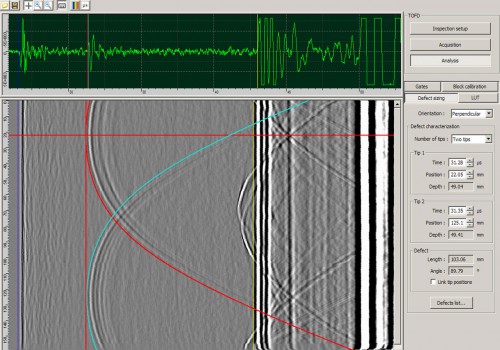
Once the data is stored and tagged, a TOFD analysis of the collected data can be performed in the ANALYSIS module. Whether the inspection is performed parallel or perpendicular to the region of interest, accurate hyperbolic cursors can be superposed to the recorded B-scan or D-Scan for precise sizing and identification of defects.
ANALYSIS module
With the data stored and tagged, the analysis of the collected data may be preformed in the ANALYSIS module. Partial or full C-Scan in addition to A-Scan and B-Scan images are obtained with a click of the mouse. The C-Scans can be obtained based on amplitude information, TOF or thickness. Signal and image filtering, as well as rotation, inversion and 3D projection can be performed on the C-Scans.
A calibration procedure for the velocities of the wedge and the inspected structure is available to perform precise measurements. Whether the inspection is performed parallel or perpendicular to the region of interest, accurate hyperbolic cursors can be superposed to the recorded
B-scan or D-scan for precise sizing and identification of defects.
Software Features:
- Complete multi-tasking software
- Intuitive user interface & menu
- Full waveform digitalization
- A-Scan synchronization gates
- Real-time A and D-Scans
- Parallel & perpendicular scan utilities
- Modeling & optimization setup
- Accurate hyperbolic cursors
- Analysis tools for plates and cylinders
- Reporting capabilities


